Creating A Connector
You build Connectors in the connector editor, on the Gateway. The editor holds everything about a Connector: its details, its tools and their Python, and its auth profiles. You will need the Optima Connectors permission. See Building Connectors.
Creating One
To create a new Connector:
- In the Gateway, open Connectors.
- Click New Connector.
-
Fill in the New Connector window:
Field What to enter Name Required. What people see on the Connector's card. It also sets the Connector's slug — see below Description What the Connector does. Say what an administrator must set up: credentials, configured values, Python packages Version Starts at 1.0.0. Usemajor.minor.patchAuthor You, or your organisation -
Click Create. The editor will open.
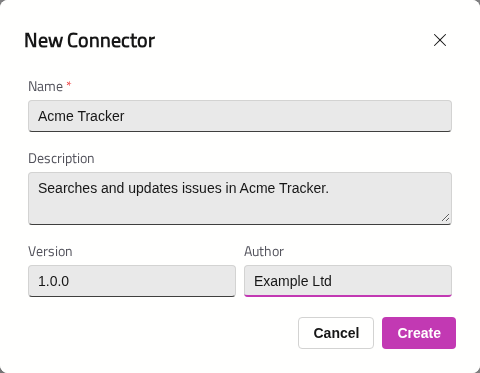
The Connector's Slug
The model sees every tool as {connector slug}__{tool slug}, with two underscores. The Connector's slug is made from the Name when you click Create: lower case, with spaces and punctuation turned into _. For example, "Acme Tracker" becomes acme_tracker. If that slug is already used by another Connector or an MCP Connector, a number will be added, such as acme_tracker_2.
The slug is fixed once the Connector exists. Renaming the Connector later changes what people see, not what the model sees. Choose the name with this in mind, and keep it short: some models refuse tool names longer than 64 characters.
Opening The Editor Again
On the Connectors page, Connectors you built or imported have an Open in editor button (a pencil) on their card. Connectors installed from the marketplace do not: they have Configure instead, and cannot be edited.
The Editor
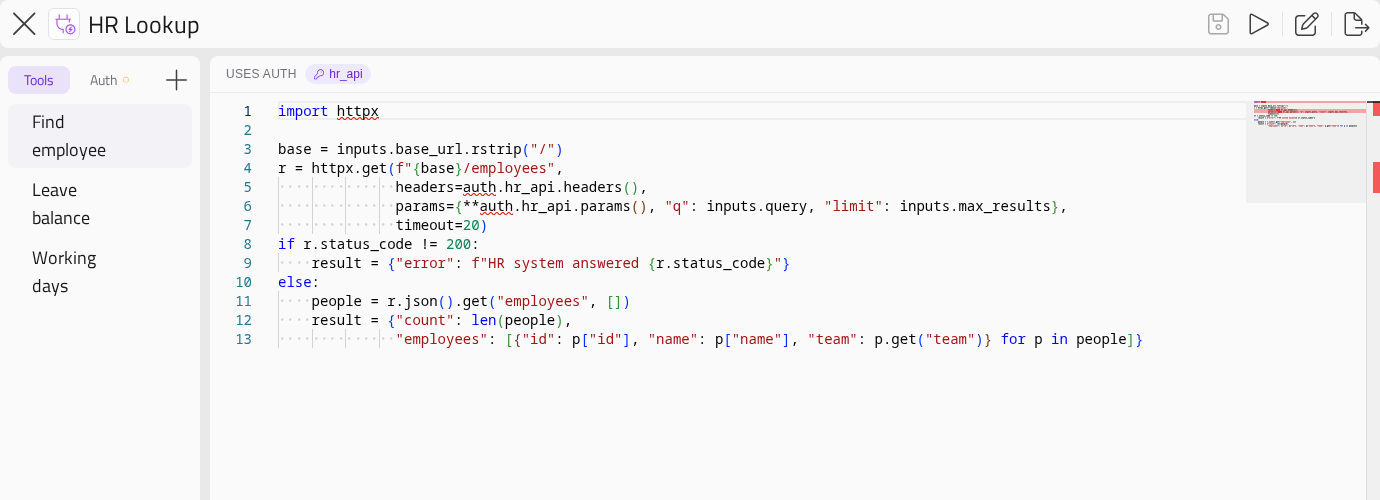
The editor has a header, a sidebar listing the Connector's tools and auth profiles, and a code editor for the selected tool.
The Header
The header has the following controls, from left to right:
| Control | What it does |
|---|---|
| × | Back to the Connectors page. Unsaved changes are saved first |
| Icon | Click to choose an image for the Connector. A small × beside it removes it |
| Name | The Connector's name, and a chip showing its Minimum runtime version when one is set |
| Save (floppy disk) | Saves the selected tool's Python, or the selected auth profile. Shown when one is selected, and active when there are unsaved changes |
| Run (play) | Opens the debug runner and runs the selected tool. Shown when a tool is selected. See Testing and Sharing |
| Edit (pencil) | Opens the Connector's details. See Editing the connector's details |
| Export as .ocon | Downloads the Connector as a .ocon file. See Testing and Sharing |
In the code editor, Ctrl+S (⌘S on a Mac) saves too.
The Sidebar
The sidebar has two tabs:
- Tools — the Connector's tools. + adds one. Point at a tool to show its pencil, which opens the tool's settings window, and its bin, which deletes it after you confirm.
- Auth — the Connector's auth profiles. + adds one. A dot on the tab means a profile is not ready — for example, because its secret has not been entered. See Auth Profiles.
Note
Deleting an auth profile from the sidebar does not ask you to confirm.
The Code Editor
Selecting a tool will show its Python. The editor checks your code as you type and knows the tool's inputs, so inputs. offers the names you have declared.
When a tool uses auth profiles, a Uses auth row above the code lists them. Click one to jump to that profile. A red one names a profile that does not exist — add it on the Auth tab, or fix the tool's list.
Switching to another tool saves the one you were on.
The Tool's Settings Window
A tool's name, descriptions, timeout, inputs, auth profiles and configured values are edited in a separate window, beside the editor. Point at a tool in the sidebar and click its pencil to open it. It follows whichever tool you select in the editor.
Your browser must allow popups from the Gateway. If it does not, the editor will say "Could not open tool editor".
The window closes its session when you leave the editor. It will then show Session ended, and Close window closes it.
See Tools and Inputs.
Editing The Connector's Details
Click the pencil in the editor's header. The window is titled Edit followed by the Connector's name. Click Save when you have finished.
Identity
Name, Description, Version and Author, as when you created it. Changing the name does not change the slug.
Raise the Version whenever you share a changed Connector. The exported file is named after it.
Classification
These fields help people find and understand the Connector:
| Field | What it is |
|---|---|
| License | The Connector's licence. Choose one, such as MIT or Apache-2.0, or type an SPDX identifier. Blank means Proprietary |
| Category | A broad area, such as Productivity or Development |
| Group | The product or company the Connector works with, such as Amazon |
| Tags | Words people might search for. Type each one and press Enter |
| Minimum runtime version | The oldest connector runtime your tools work with, such as 1.3.0. Leave it blank to use the Gateway's current runtime version when you export. A Gateway with an older runtime warns before importing |
Execution
Where this connector runs decides where the Connector's tools run. Choose Server — gateway runtime for tools that run on the Gateway, or Client — connected desktop for tools that run in the Optima Chat desktop app, on the person's computer. See Where a connector runs.
A Client Connector can use only Static credential auth profiles. If it has an OAuth profile, the window will not save until you remove that profile or choose Server — gateway runtime.
Python Dependencies
These are extra packages your tools need, from PyPI. Most Connectors need none: Python's standard library and the packages that come with the runtime cover most work. See Packages.
To add one, enter its Package name and an exact Version, such as 3.0.3, and click Add. You can also give extras, separated by commas, and an environment marker. Ranges and wildcards are refused.
Note
Packages are not installed automatically. Until someone with the Connector Dependencies permission installs them, all of the Connector's tools are hidden from the model. Say in the Connector's description that it needs packages, and why.
Environment Variables
Tools start with a minimal environment, so that credentials in the host's own environment stay out of reach. If a tool needs another variable — for example, JAVA_HOME for a build — type its name and click Add.
- Names only, never values. Each machine that runs the tool passes its own value.
- Letters, digits and underscores; no wildcards. Names beginning with
PYTHONare refused, because Optima sets those itself. - Administrators see the list when they import the Connector, and on its card.
Never use this to get a credential. Credentials belong in auth profiles.
Links
Homepage URL and Repository URL — where to read more about the Connector.
One Editor At A Time
Only one person can have a Connector open in the editor. Anyone else who opens it will see Connector is locked and "{name} is currently editing this connector", and the Connector's card on the Connectors page will show Editing and their name.
The lock is released when they leave the editor, or about half a minute after they close their browser tab.
If your connection drops for long enough, you will lose the lock too. The editor will then show Session timed out, or Editing session ended if someone else has opened the Connector since. Click Go back to return to the Connectors page.
Switching A Connector Off While You Work
A new Connector is switched on, so its tools are offered to people as soon as you add them. To keep it out of everyone's chats while you work, open a tool's settings window and turn the switch in its header to Off.
Off withholds every one of the Connector's tools from chats, Assistants, Agents and the API. Its tools, settings and credentials are kept, and you can still run its tools in the debug runner. Turn it back On when it is ready.