Testing And Sharing
You should test each tool in the editor's debug runner as you write it, then in a real chat. When the Connector is ready, you can export it as a .ocon file for another Gateway to import.
The Debug Runner
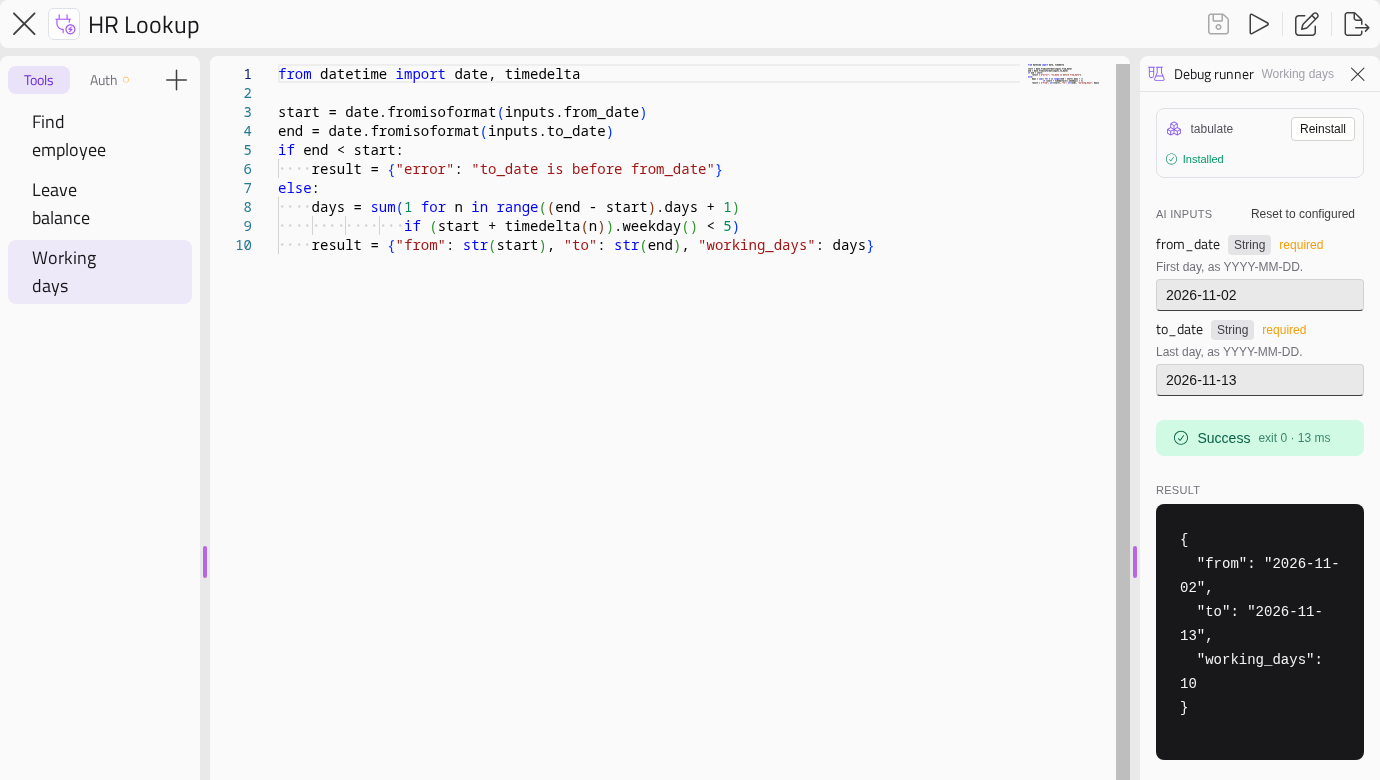
The debug runner runs the selected tool on the Gateway, with inputs you type in, and shows exactly what came back.
Select a tool and click the run button (the play button) in the editor's header. The first click will open the Debug runner panel and run the tool; after that, each click runs it again. While it runs, the stop button cancels the run. The × closes the panel.
Note
The runner runs the saved Python. Save your changes first (Ctrl+S, or ⌘S on a Mac).
Inputs
The tool's inputs are grouped by mode:
| Group | Inputs |
|---|---|
| AI inputs | AI runtime inputs — what the model would supply |
| Constants | Constant inputs |
| Hybrid | Both inputs |
Each starts with the value configured in the tool's Input values, or its default. Reset to configured puts those back. What you type is kept for each tool while the editor is open.
Leave an optional input empty to see what your script does when the model leaves it out. If a required input is empty, the runner will say "Required input '{name}' has no value." and will not run.
Output
When the run finishes, the runner will show the following:
| Part | What it shows |
|---|---|
| Success or Failed | With the exit code and how long the run took |
| Result | The JSON your script set as result. "No result returned (the script didn't set result)." means it never set it — often because it was set inside a function |
| Print output (stdout) | Anything the script printed. Useful while you work; the model never sees it |
| stderr | Errors, including a Python traceback with line numbers that match your script |
The runner shows the whole result. The model sees at most 16 KB of it, so check the size of a large one. See Keeping results small.
What The Runner Does Differently
The runner is a quick check, not a full copy of a real call:
- No credentials. The runner does not supply auth profiles. A tool that uses
auth.<name>will fail there with anAttributeError. Test those tools in a chat. - Always on the Gateway. A Client Connector's tools run on the Gateway's machine, not in the desktop app, and without a Workspace.
- No safeguards. Read before write is not applied, and images are not shown.
- Timeouts. The tool's own timeout applies. A timeout of
0really is unlimited here, because you can cancel.
It does use the Connector's Python packages and the same environment variables a real call would.
Python Packages
If the Connector declares Python packages, a strip at the top of the runner lists them and says whether they are installed. Install, Reinstall or Retry installs them. This needs the Connector Dependencies permission, and Install connector Python dependencies switched on in Settings. When it is off, the strip says "Installs disabled — Settings".
Until they are installed, runs will fail when your script imports them — and the Connector's tools are hidden from the model.
Testing In A Chat
The runner proves a script works. Only a chat shows whether the model understands when and how to use it. To test in a chat:
- Make sure the Connector is On. See Switching a connector off while you work.
- Enter its credentials on the Auth tab, and any Input values it needs.
- In Optima Chat, ask something the tool should answer. For a Client Connector, use the desktop app with the Connector runtime installed.
Watch which tool the model picks, what arguments it sends, and what it does with errors. When it misuses a tool, the fix is usually in the AI Description or an input's description, not in the Python.
To limit who sees an unfinished Connector, test it through an Assistant that is shared only with you, and turn on Only allow assistants. See Who Can Use Connectors.
Exporting A .ocon File
A .ocon file holds the whole Connector, so that another Gateway can import it.
Click Export as .ocon in the editor's header, or on the Connector's card on the Connectors page. The file will download as {slug}-{version}.ocon — for example, acme_tracker-1.2.0.ocon.
- Only Connectors built or imported on this Gateway can be exported, not marketplace ones.
- The Connector needs at least one tool.
- In the editor, save your changes first. Export as .ocon is greyed out while there are unsaved changes.
The following table shows what the file includes and leaves out:
| In the file | Not in the file |
|---|---|
| The Connector's details, icon and version | Credentials: secrets, passwords, usernames, client IDs, sign-ins. See Auth Profiles |
| Every tool, with its Python, descriptions, inputs, defaults and timeout | The Input values you configured on this Gateway |
| Auth profiles, without their values | Installed Python packages — the list is included, the packages are not |
| Python dependencies and environment variable names | The On / Off switch |
If Minimum runtime version is blank, the file records the version of the runtime on your Gateway.
Warning
A .ocon file is not compiled or protected. Whoever imports it can open it in their editor and read and change the Python.
On The Gateway That Imports It
An administrator imports the file from the Connectors page. See Importing and Exporting Connectors. As the author, you should know the following:
- It arrives as a Connector they can edit. It is not linked to your copy, and is not updated when you change yours.
- The slug is made again from the Connector's name. If they already have a Connector with that slug, a number will be added, which changes every tool's name for the model. Importing a newer version alongside an older one does exactly this — they should delete the old one first, and enter its credentials again.
- They enter their own credentials and input values. Say in the Connector's description what they need to set up, and in each auth profile's description where to get the credential.
Publishing On The Marketplace
There is no way to publish to the Optima connector marketplace from the Gateway. If you would like a Connector listed there, contact Parker Software.
Building A .ocon Outside The Editor
You can also build a .ocon file with your own tools — for example, to keep each tool's Python in its own file under version control. A .ocon file is a ZIP archive with these entries at its root, not in a folder:
| Entry | Required | What it holds |
|---|---|---|
manifest.json |
Yes | The listing: manifest_version (always "1.0"), a fixed id (a UUID), name, description, version, license, and optionally author, group, category, tags, min_runtime_version, execution_scope (0 Server, 1 Client), dependencies, environment_passthrough, and a tools list of {name, description} |
connector.json |
Yes | "FormatVersion": "2.0", the Tools (each with its Python, Inputs, AuthProfileNames and TimeoutSeconds) and the AuthProfiles |
icon.png |
No | A real PNG, up to 256 KB. 256 × 256 pixels is what the editor produces. Leave it out rather than include an invalid one: a bad icon fails the whole import |
The file may be up to 8 MB, and 16 MB uncompressed.
The best way to see the exact shape is to export a small Connector from the editor and look inside. There are two things the editor checks for you that an import does not:
- Names. Tool slugs, input names and auth profile names must be valid Python names and not keywords. A bad input name breaks every call of the tool.
- Defaults.
DefaultValueis always a string, such as"200"or"false", never a number or boolean.
Generate connector.json with a JSON library rather than by hand, so that each script's line breaks and quotes are escaped correctly.